

Not a staging-rucksciencecom.kinsta.cloud member? That’s ok, just tell us where to send the program or register for a free account.
As a staging-rucksciencecom.kinsta.cloud member, you have unlimited access to the .PDF version of our touch rugby training guide.
Whether touch rugby is your primary sport, or you just play to supplement your regular rugby training, it’s a fun way to get and stay in shape. However, like any sport, you’ll get a lot more from it if you are adequately prepared. You don’t need to be Hulk-strong for touch rugby, but improving your speed, agility, and fitness will have a significant impact on your performance. Luckily, those are all the things that this touch rugby training guide will give you.
Touch rugby used to be a training tool that allowed ruggers to work on their playing skills without having to contend with potentially dangerous contact. It was also popular in schools.
However, like sevens, touch rugby has become a sport in its own right, attracting players of all ages and abilities.
There are several international organizations and federations, and a growing number of ruggers only play this version of the game. Described as “tag for grown-ups,” a lot of rugby clubs now have touch sides. As well as being a legitimate sport and useful training tool, touch rugby allows players to stay in the sport long after retiring from the full-contact rugby as the risk of injury is much lower. It also attracts new players who may be intimidated by full-contact rugby. Touch rugby has a good social aspect, and leagues and tournaments are very popular.
As the name implies, touch rugby is a semi-contact sport. You can’t call it non-contact as the players need to touch one another to execute a tackle but, compared to being barged by a bullish number eight, purposeful contact is all-but non-existent.
This means that touch rugby is potentially much safer than regular rugby, giving it mass appeal especially for older players and those who would prefer not to sport black eyes and cauliflower ears after playing. Some touch rugby sides are mixed because, without the contact, the advantages of size and strength all-but vanish.
Touch rugby involves no rucks, mauls or scrums, but that doesn’t mean it’s easy. On the contrary, it’s fast-paced, and play is often uninterrupted for long periods. This makes it very physically demanding and a great way to get fit or lose weight.
The physical benefits of touch rugby are obvious, and statistics from a 45-minute touch rugby session showed:
Whether touch rugby is your primary sport, or you just play to supplement your regular rugby training, it’s a fun way to get and stay in shape. However, like any sport, you’ll get a lot more from it if you are adequately prepared. You don’t need to be Hulk-strong for touch rugby, but improving your speed, agility, and fitness will have a significant impact on your performance.
Cardiovascular fitness is your ability to take in, transport, and utilize oxygen, and is expressed as your V02 max. The more oxygen you can get to your working muscles, the higher your VO2 max will be.
Cardiovascular fitness is affected by several things:
Because touch rugby involves extended periods of uninterrupted play, and ruggers will run considerable distances during a game, cardiovascular fitness is very important. Unlike full-contact rugby, stoppages are relatively few and far between, and much shorter than in the regular game. Because of the sustained nature of touch rugby, cardiovascular fitness is paramount.
It doesn’t matter how fast or agile you are, if a few minutes of play leave you laying on the sidelines trying to catch your breath, you won’t be able to make much of a contribution to the game.
Sprinting speed is very valuable in touch rugby. With lots of wide-open spaces, being able to cover the ground more quickly than the opposition could be the difference between winning and losing. In offense and defense, speed is crucial.
Unlike sprinting on a track, where straight-line speed is the norm, in touch, you’ll need to be able to sprint in multiple directions to avoid or tag members of the opposing team. You’ll also need to be able to accelerate numerous times, i.e., speed up, slow down, and then speed up again. Changes in pace make you harder to tackle.
Rugby players need to be able to produce bursts of speed throughout a match. It’s no good being lightning-fast at the beginning of a game only to end up jogging toward the end. Instead, you need sprint endurance as well as pure speed.
Agility is your ability to respond quickly to a stimulus. In touch rugby, this normally means changing direction in response to the actions of the opposition or otherwise respond to the flow of play.
In full-contact rugby, you can often disguise a lack of agility with pure strength and power. If your path is blocked by another player, you can often just charge straight through them. In touch, this would count as a tackle against you and, if it’s the sixth contact, you’ll lose possession.
Subsequently, agility is vital for successful touch rugby. Your ability to dodge the opposition or change direction quickly to land a tackle could be all that stands between winning or losing.
Because touch rugby is a semi-contact sport, you don’t need to be massively strong to play it. This contrasts significantly with the full-contact version of the game. In full-contact rugby, strength and power are vital components, especially for forwards and in tackles.
With no requirement to physically overpower the opposition, strength and power are much less critical for touch rugby players. However, that doesn’t mean you should ignore these fitness components altogether.
Strength and power have a positive influence on both speed and agility and can also help reduce your risk of injury as strong muscles increase joint stability.
Touch ruggers do not need the massive strength of their full-contact counterparts, but they should not be weak either. Just a couple of sessions in the gym per week will be sufficient.
Whatever type of training session you are about to do, you’ll get more from it if you spend a few minutes warming up before you start. Warming up has several important purposes:
Warming up might take 10-15 minutes of your precious training time, but your workout will be safer and more productive if you warm up properly.
In the old days, warm-ups invariably involved a few minutes of cardio, followed by some static stretches. While that was better than nothing, it left a lot to be desired. Instead, ruggers should use a more sports and activity-specific warm-up that prepares their body for the session they are about to do. For example, if you are about to lift weights in the gym, 15 minutes on a stationary bike will have little benefit.
To warm up for rugby training and playing, use the RAMP method. RAMP stands for:
Forget about static stretches that involve holding your position for several seconds or even a minute or so. This type of stretch causes your heart rate to drop and your muscles to relax. That’s good for a cool-down but the opposite of what you need in a warm-up.
Instead, you should build your warm-up around dynamic stretches. Dynamic stretches involve movements which not only stretch your muscles, they also elevate your heart rate and increase core temperature.
Good examples include:
Simply choose a few of these exercises and do 10-15 reps of each one without pausing to warm up and mobilize at the same time. In 5-10 minutes or less, you should feel lose and ready to move onto the next part of your warm-up.
Playing and training for rugby are very dynamic activities, but long hours spent sitting at a computer or driving can put essential muscle groups to sleep. The muscles most likely to need waking up are your glutes, core, and upper back.
Most activation drills involve tensing the target muscle in a variety of positions. Each exercise is hard enough to activate your muscles but easy enough not to be exhausting. You should aim to contract the target muscle for about 5-10 seconds for 3-5 reps at about 20% of maximal effort.
Examples include:
As before, choose a few appropriate exercises and do them without pausing to maintain your heart rate and body temperature. Do just enough reps to get your muscles firing correctly, but not so many reps that you start to feel tired.
ogging before lifting weights makes no real sense, and yet that is the sort of warm-up many ruggers use. However, if you are going for a run, jogging makes perfect sense.
For this warm-up stage, choose activities that are similar but easier than what you are about to do. For example, if you are about to do a maximal speed sprint session, your movement prep could involve several sets of half speed sprints from a rolling start.
Make sure you practice as you are going to perform. In other words, your technique should be identical even though you are using lighter loads or working at a lower intensity. Don’t get sloppy just because you aren’t into your main training session yet. Do just enough reps and sets to feel your muscles working but not so many that you begin to tire.
Examples include:
Potentiation is all about getting your muscles firing as powerfully and efficiently as possible. This will increase your force production potential. If done right, by the end of your warm-up, you’ll feel stronger and more powerful than you did at the start. Your muscles and nervous system will be firing on all cylinders, and you’ll be 100% ready to train or play at your best.
Potentiation is best achieved with brief sets of explosive exercises. Stop your set well before you start to feel fatigued but give each rep your all.
Examples include:
As before, make sure your chosen potentiation exercises match your upcoming workout. There would be no point doing plyo push-ups before a sprint session. In contrast, a few sets of squat jumps will help fire up your legs ready for tearing up the track.
Time spent warming up is never wasted, but you should still make sure your warm-up is as specific and time-efficient as possible. How long should you spend warming up? That’s up to you. The simple answer is that your warm-up should be as long as you need, but not so long you waste time.
If you have been mostly sedentary for the last few hours, are older, or have any aches or pains, you may benefit from a longer warm-up. In contrast, if you have a manual labor job, are younger, or are about to do any easy workout, you won’t need to spend so long on your warm-up.
Customize your warm up, both in terms of duration and content, according to what you have done and what you are about to do.
Cardiovascular fitness is the foundation on which all other training components are built. The fitter you are, the more productive your sprint, agility, and strength training workouts will be. You’ll not only be able to train longer and harder, but you’ll also recover faster too, both between sets and workouts.
This is especially true for touch rugby because a game of touch involves a lot of sustained movement and relatively few breaks. While a lot of play will center around start/stop sprinting, you’ll also spend a whole lot of time running and jogging back into position.
Because of this, touch rugby players should build their workouts around cardio and, in particular, running. While activities like swimming and rowing have their benefits, they are not specific to the demands of touch rugby. Rugby involves a lot of running, and so running should be the mainstay of your cardio workouts.
Most touch rugby players should do 2-4 cardio sessions per week. The fitter you are, the less cardio you need to do. In contrast, if your fitness needs work, or you are currently overweight, more cardio may be appropriate.
The biggest mistake most people make with cardio is just going through the motions. Aimless cardio training will not make you a better rugger. Instead, you should follow a progressive cardio training program designed to improve your fitness. Running the same three-mile loop at the same speed will not get you fitter.
Instead, to get fitter, you need to manipulate the cardio training variables so that your workouts gradually get harder.
Frequency – how many times per week you train. This is the least useful variable because you can only dedicate so many workouts to cardio. Most ruggers need 2-4 cardio sessions per week. More than four sessions will mean that you don’t have much time left to spend on other types of rugby training, such as speed and agility.
Intensity – for a cardio workout to be effective, your heart rate should be between 60-90% of your age-adjusted maximum.
Calculate this with the following formula:
220 – age in years x 0.6 (lower limit)
220 – age in years x 0.9 (upper limit)
As you get fitter, and using a heart rate monitor to measure your heart rate, increase the intensity of your workouts by exercising at a slightly higher heart rate.
Time – exercising for longer will increase your fitness. However, like frequency, there is only so much training you can do before your workouts start to become impractical. For ruggers, 40-60 minutes per session should be sufficient. If you can do more than 60 minutes, you run the risk of accumulating overuse injuries and wasting your valuable training time. If you can exercise for 60 minutes or more, you may get better results if you manipulate one of the other training variables to reduce workout duration, e.g., increase intensity.
Type – type refers to the modality of your workout. Most exercisers simply “do cardio” and plod along at a slow pace for an extended period. However, there are several other ways you can organize your workouts that will produce better results.
Those methods are explained below…
Also known as long slow distance training, or LSD for short, slow-paced cardio is exactly what it sounds like. This is what most exercisers do for cardio. With this type of workout, you head out and run for 30-60 minutes while keeping your heart rate at around 60% of your maximum.
This type of training develops your base fitness and endurance. However, if you want to build a higher level of fitness, slow-paced cardio can be somewhat limiting.
Tempo training, also known as threshold training, involves exercising at 85-90% of your maximum heart rate. Tempo training will increase your fitness and, because the workouts are more intense, they also tend to be shorter. 20-30 minutes should be sufficient for most ruggers. Think of tempo training as a race, and you won’t go far wrong. You should finish a tempo workout feeling like, if you had gone any faster,
you would have had to stop.
Fartlek is Swedish for speed play. With fartlek training, you run at a variety of speeds and over a range of distances at random. For example, if you went out for a 40-minute run, your workout would involve a mixture of walking, jogging, running, and sprinting. Fartlek allows you to train a range of heart rates to develop a wide range of cardiovascular fitness. In many ways, fartlek also replicates the demands of touch rugby.
Interval training involves brief periods of high-intensity cardio interspersed with short rests. For example, you could run 400 meters, jog 100 meters, and repeat 10 times to total 5,000 meters.
Interval training is a very flexible workout method. You can use it to develop aerobic or anaerobic fitness. Manipulating the work and rest intervals change the effect of your workout.
Aerobic Intervals – Work to rest intervals 1:1 to 1:0.5, e.g., fast running for five minutes, walk/jog for two and a half minutes to five minutes to recover. Repeat three to five times.
Lactic acid anaerobic intervals – Work to rest intervals 1:2 to 1:4, e.g., hard rowing for sixty seconds, easy rowing for three minutes to recover. Repeat six to eight times.
Creatine Phosphate anaerobic intervals (the energy source for flat out sprinting) – Work to rest intervals 1:6 to 1:10, e.g., ten-second exercise bike sprint, ninety seconds slow pedaling to recover. Repeat ten to fifteen times.
As you can see, the more intense the effort, the longer the rest periods tend to be.
The main thing to avoid is doing cardio for the sake of it. Lots of “junk miles” won’t make you any fitter but will use energy that could have been better used elsewhere, or even increase your risk of injury. Do enough cardio to get the results you want, but no more than that.
To summarize:
Unfit? —–> Do more cardio, more often
Overweight? —–> Cardio can help, but you should not need to do it indefinitely
Fit and healthy? —–> Do enough cardio to maintain your current fitness levels
Off-season? —–> More cardio is appropriate, with the emphasis on aerobic training
Pre-season/mid-season? —–> Less cardio is more appropriate, emphasizing anaerobic training
Don’t just focus on one type of cardio, e.g., slow-paced cardio or intervals. Instead, use a variety of training methods to maximize your fitness for rugby.
For example:
As sprint coach legend Charlie Francis was so fond of saying, speed kills. Obviously, he was referring to the effect of speed on the opposition! However, unlike a track athlete, ruggers don’t just need straight line speed, they also need to be able to change direction on a dime – and that’s agility.
Speed and agility are inherent qualities that some players have in abundance, but that doesn’t mean they can’t be trained too. Don’t worry if you are more of a carthorse than a racehorse – you can still become faster and more agile.
Unlike track sprinters, who know precisely how far they are going to run at any given time, ruggers can find themselves sprinting a couple of meters or having to stride out for the entire length of the pitch. They may sprint the whole distance at top speed or have to slow down and then speed up again. A rugger’s sprint could begin from a stationary start, or you could already be on the move.
Because of this, speed training for rugby needs to incorporate all of these elements to be effective. Just being “track fast” is not enough; you need to be rugby fast.
Here are seven workouts that are designed to increase speed for touch rugby.
Set up a 10-meter square and put two obstacles in the middle. One player sprints around the outside to the opposite corner while the other player sprints through the middle and around the obstacles. The first player to the opposite corner wins. Swap roles rep-by-rep. Do 3-5 sets, resting 2-3 minutes between efforts.
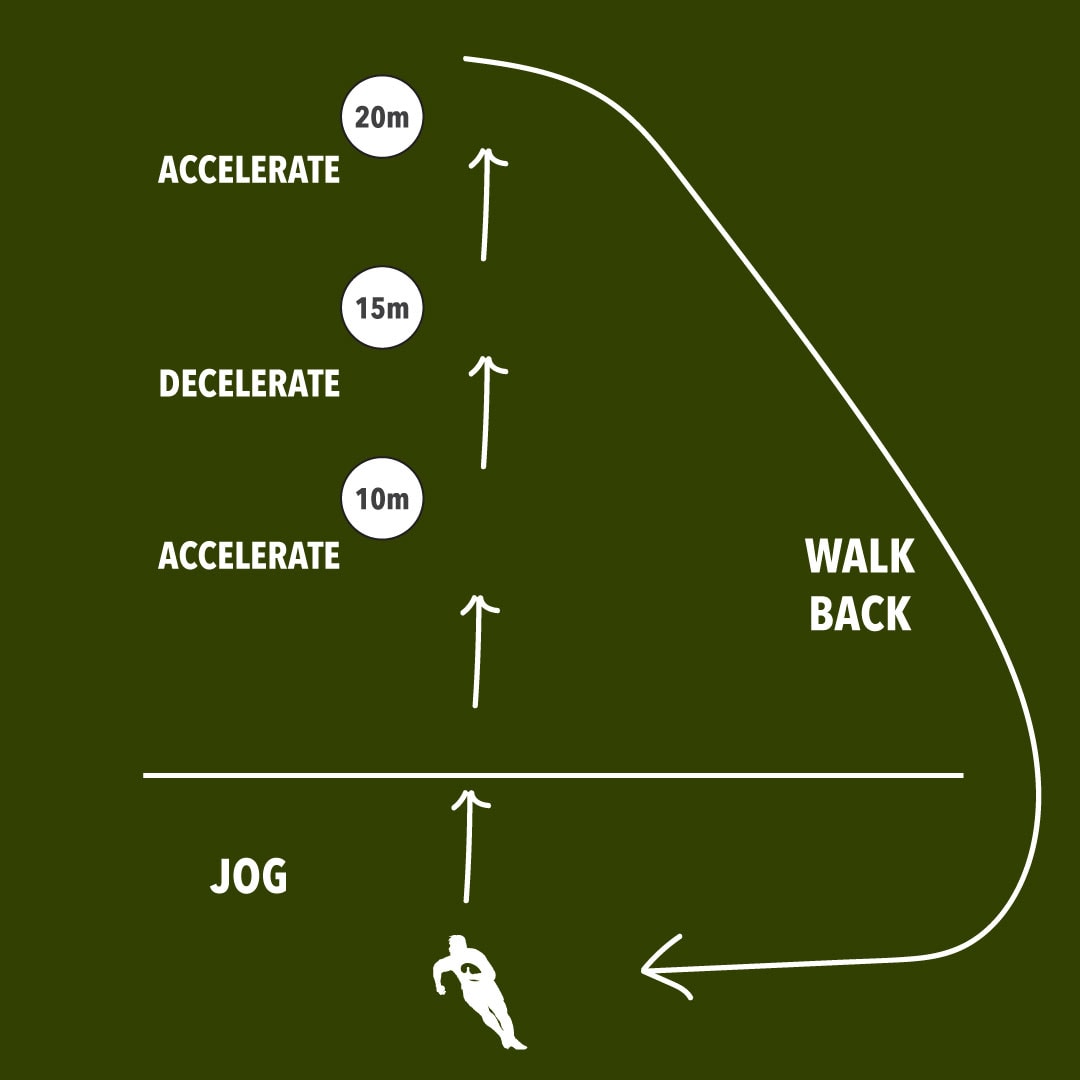
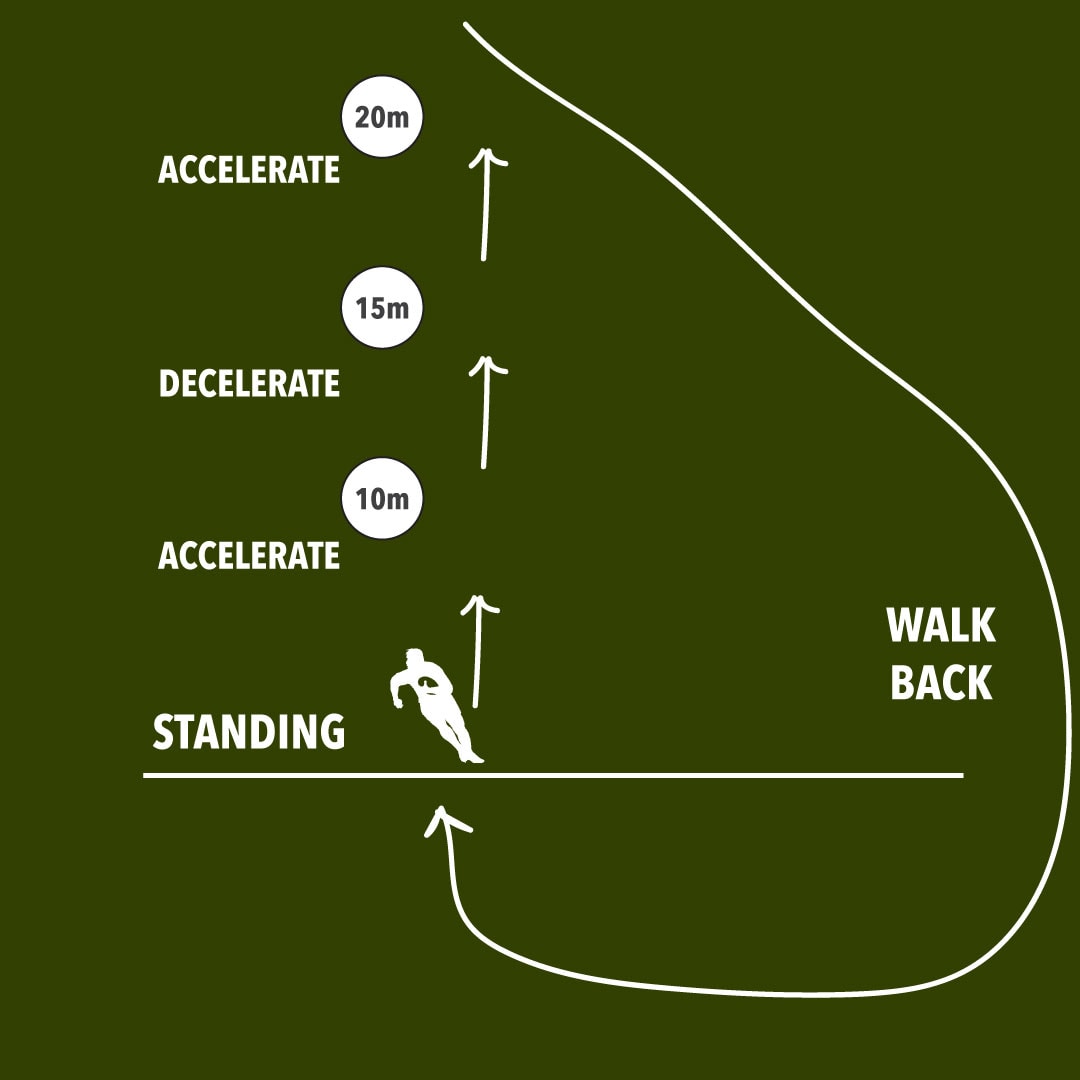
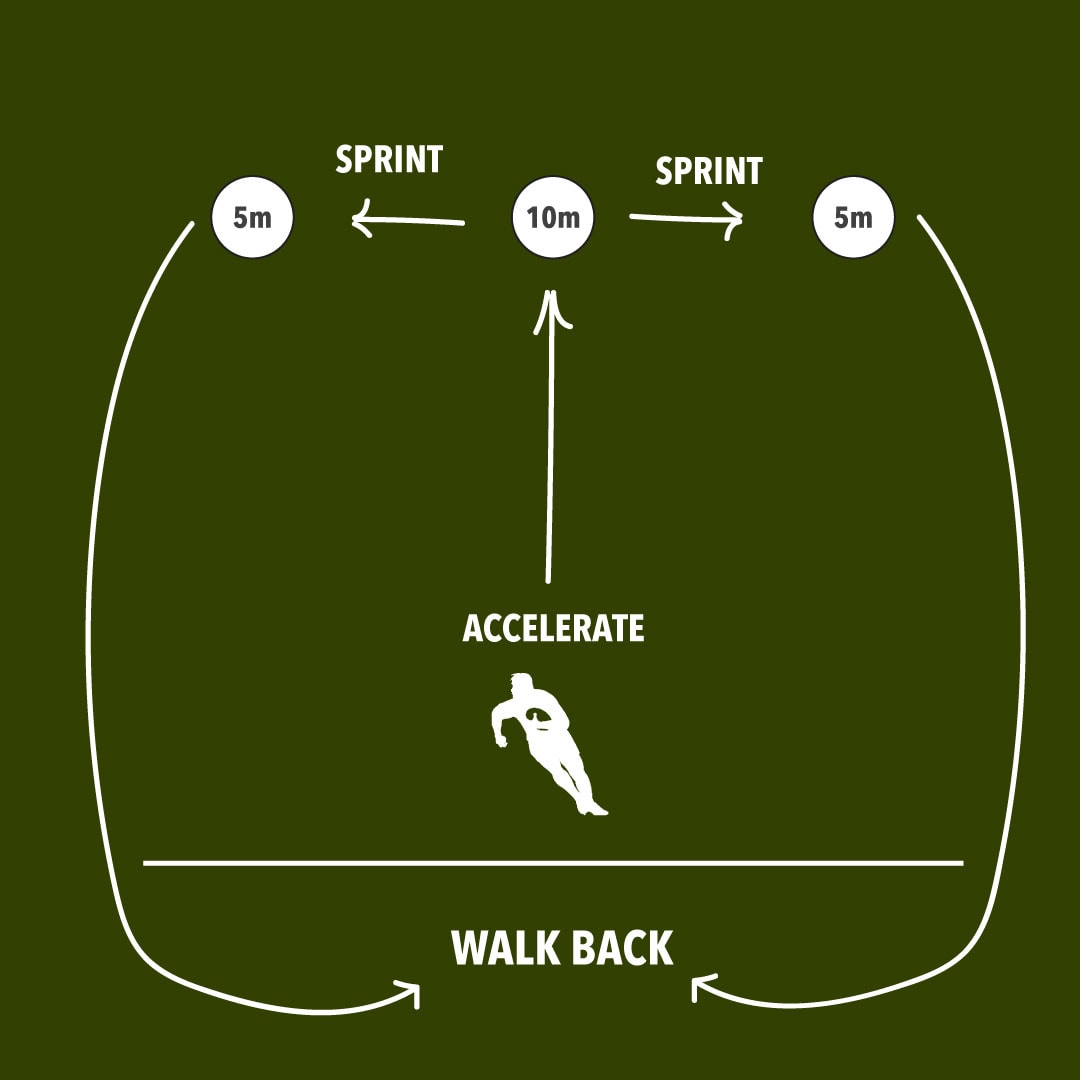
Place markers out at 10 meters, 15 meters, and 20 meters. Jog up to the start line and then accelerate as fast as possible out to the 10-meter mark. Decelerate to the 15-meter mark and then accelerate again to the 20-meter point. Walk back to the start point. Do 3-5 sets, resting 2-3 minutes between efforts.
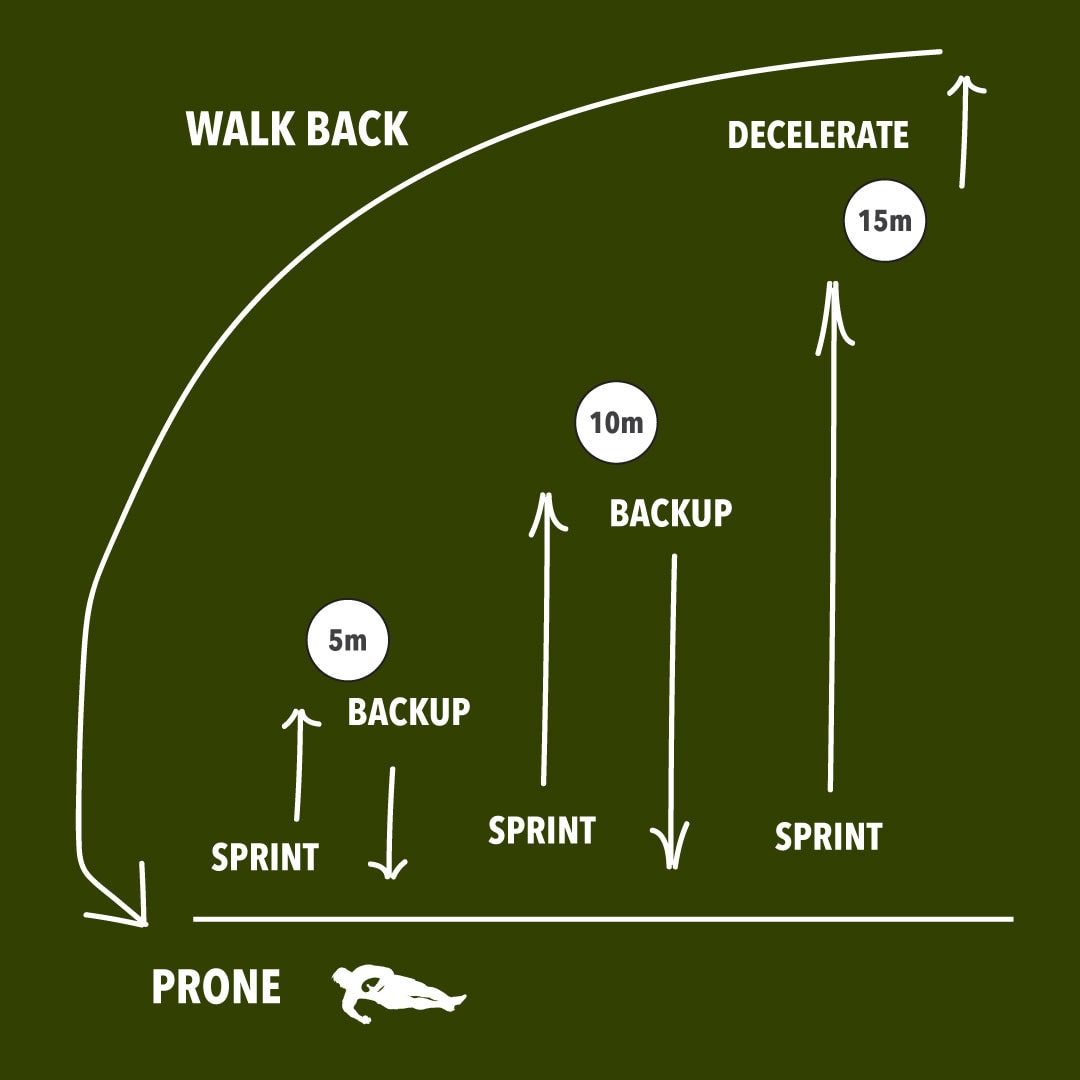
Place markers at 5m, 10m, and 15m. From a prone or supine position, get up and sprint forward to the 5-meter line. Stop quickly and run backward to the start. Stop again and then run forward to the 10 meter-line. Stop quickly and run backward to the 5-meter line. Finally, run forward to the 15-meter line and then decelerate gradually. Start your next set from the opposite body position.
Do 3-5 sets, resting 2-3 minutes between efforts.
This workout takes you through a range of sprints to develop short, medium, and long distance sprints as well as increasing sprint endurance. After all, you don’t just sprint once in touch rugby, you have to be able to sprint again and again, even as fatigue sets in.
10 x 15m sprints (walk back slowly and recover as needed)
8 x 25m sprints (walk back slowly and recover as needed)
6 x 40m sprints (walk back and recover as needed)
4 x 70 m sprints (walk back and recover as needed)
This workout takes place on a rugby pitch. It’s very rugby specific and, like the preceding workout, incorporates a range of sprint disciplines to make sure you are fast over all possible distances.
4 x flying starts and pick-ups – from the try line, jog out toward the 22-meter line and then sprint to the halfway line. Decelerate to the next 22-meter line and then sprint to the last try line. Walk back to recover and repeat.
4 x sprint and backpedal – from the try line, sprint out ten meters, stop quickly and backpedal for five meters, sprint forward for ten meters, backpedal for five, and finally sprint forward for a final ten meters. Walk back to recover and repeat.
4 x lengths and widths – sprint the length of the pitch from corner to corner, and then jog with width. That’s one rep – keep going!
1 x Rugby pitch suicides – starting on the dead ball line at the very end of the pitch, run out and back to each and every line on the rugby pitch until you reach the dead ball line at the other end of the pitch. Work hard – this is your final exercise.
Speed is nothing if you can’t control it. By that, we mean you can’t change direction to avoid (or reach) the opposition. Remember, in touch rugby, the opposition doesn’t need to bring you to the ground. Even the lightest touch counts as a tackle. Whether you are playing in offense or defense, agility is crucial.
Here are seven workouts designed to increase your agility for touch rugby.
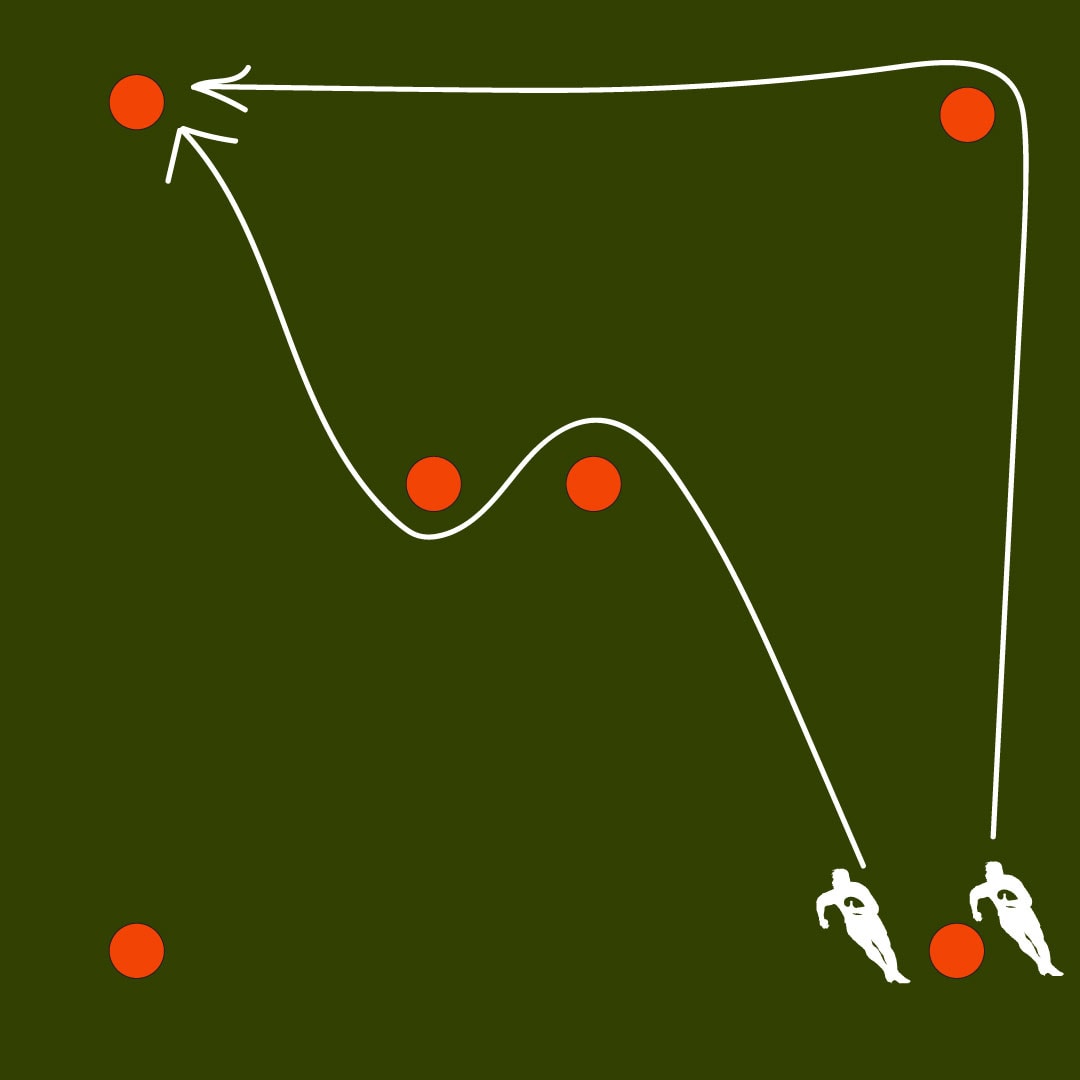
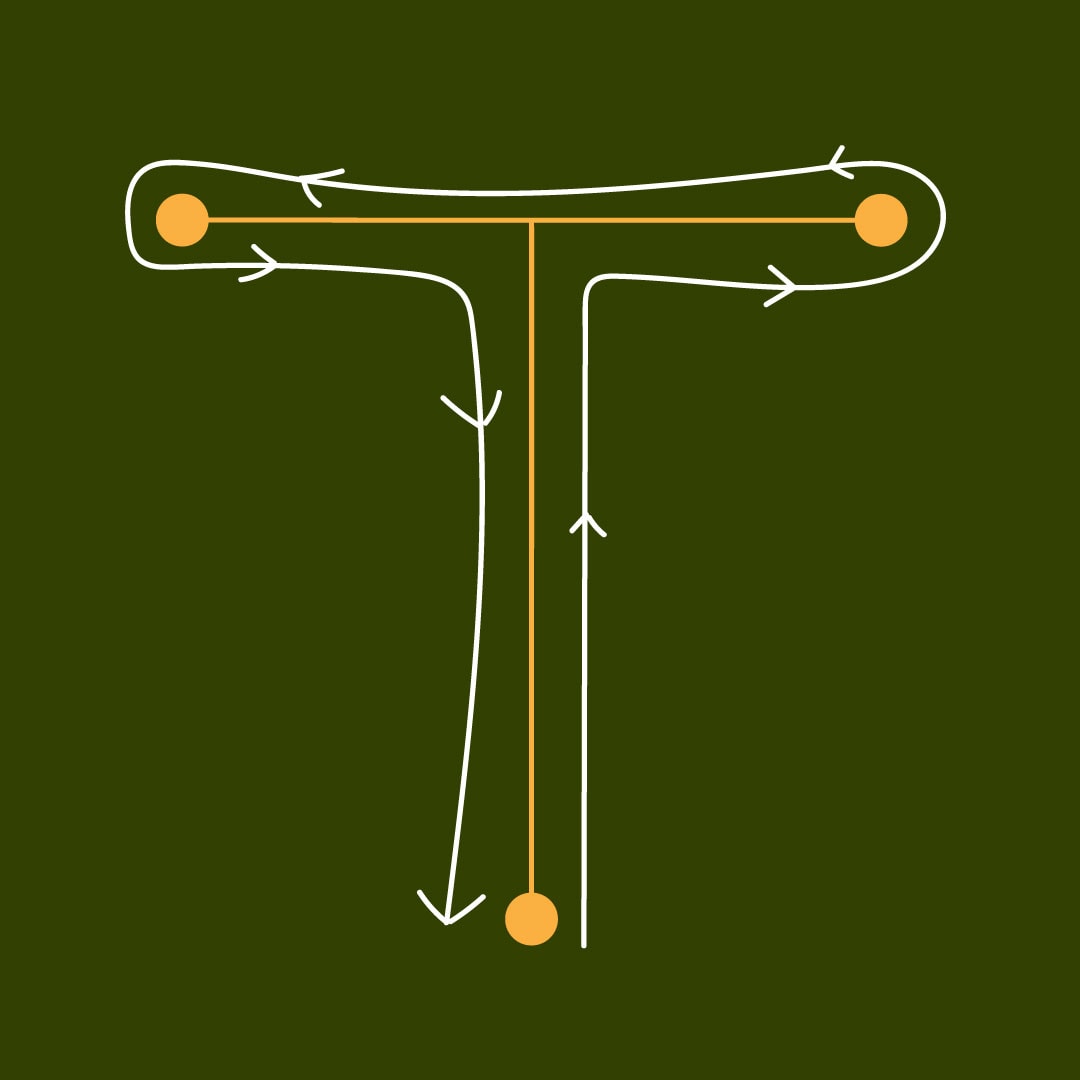
This drill develops forward, backward, and sideways running speed. Because it involves several changes of direction, it’s also good for agility and reaction time too.
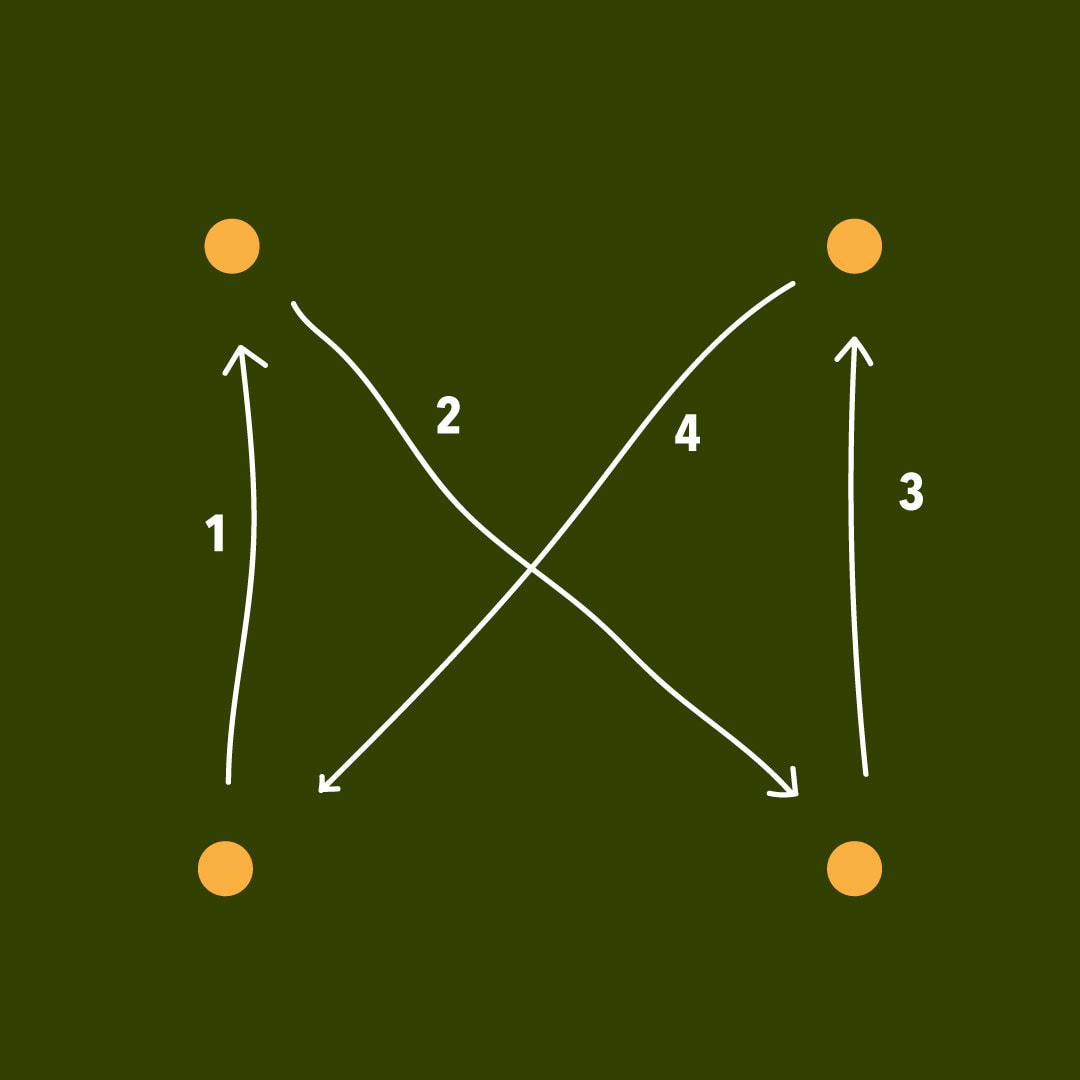
Lay out four marker cones, as shown in the diagram. The cones should be five meters apart. No cones? No problem! Use rocks instead.
Start at the base of the T and the sprint forward. Sidestep out to the right-side cone, and then all the way across to the left-side cone. Sidestep back to the center and then run backward, returning to your starting point. Rest a minute or two and then repeat. Reach down and touch each cone to add more of an agility demand to this exercise.

Use the same grid as above as the previous page. But this time, sprint around the outside of the T. Change directions to work on turning off both sides.
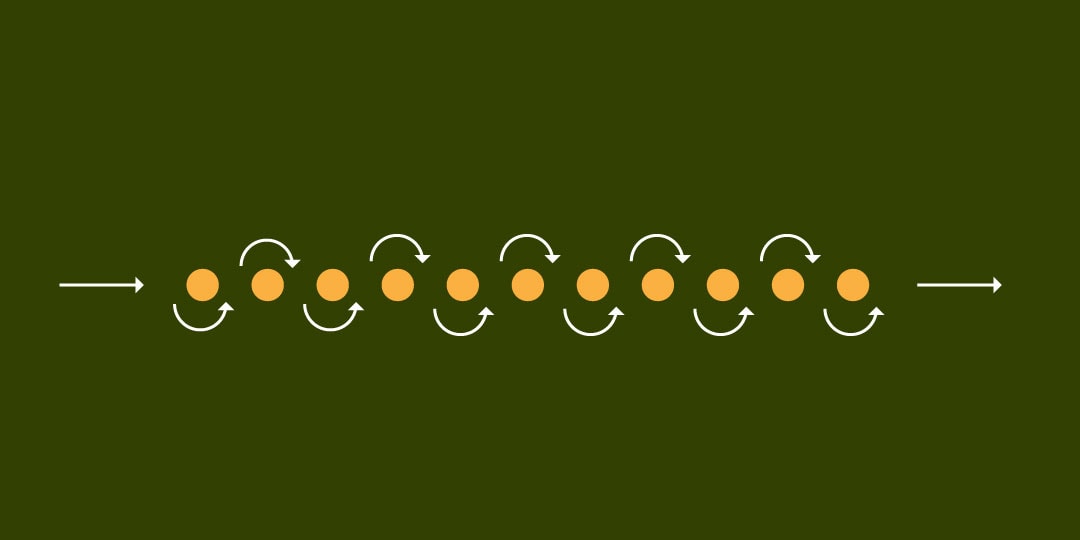
This drill is great for developing running speed and agility. Lay out ten marker cones, as shown in the diagram. The cones should be around 2-3 meters apart. The closer the cones, the more agile you’ll need to be.
With a 5-meter rolling start, run through the cones staying as close to the markers as possible. Make a concerted effort to run in as straight a line as possible and push dynamically off your outside foot. At the end of the cones “lean and go” and sprint out to a final marker 10-15 meters from the last cone.
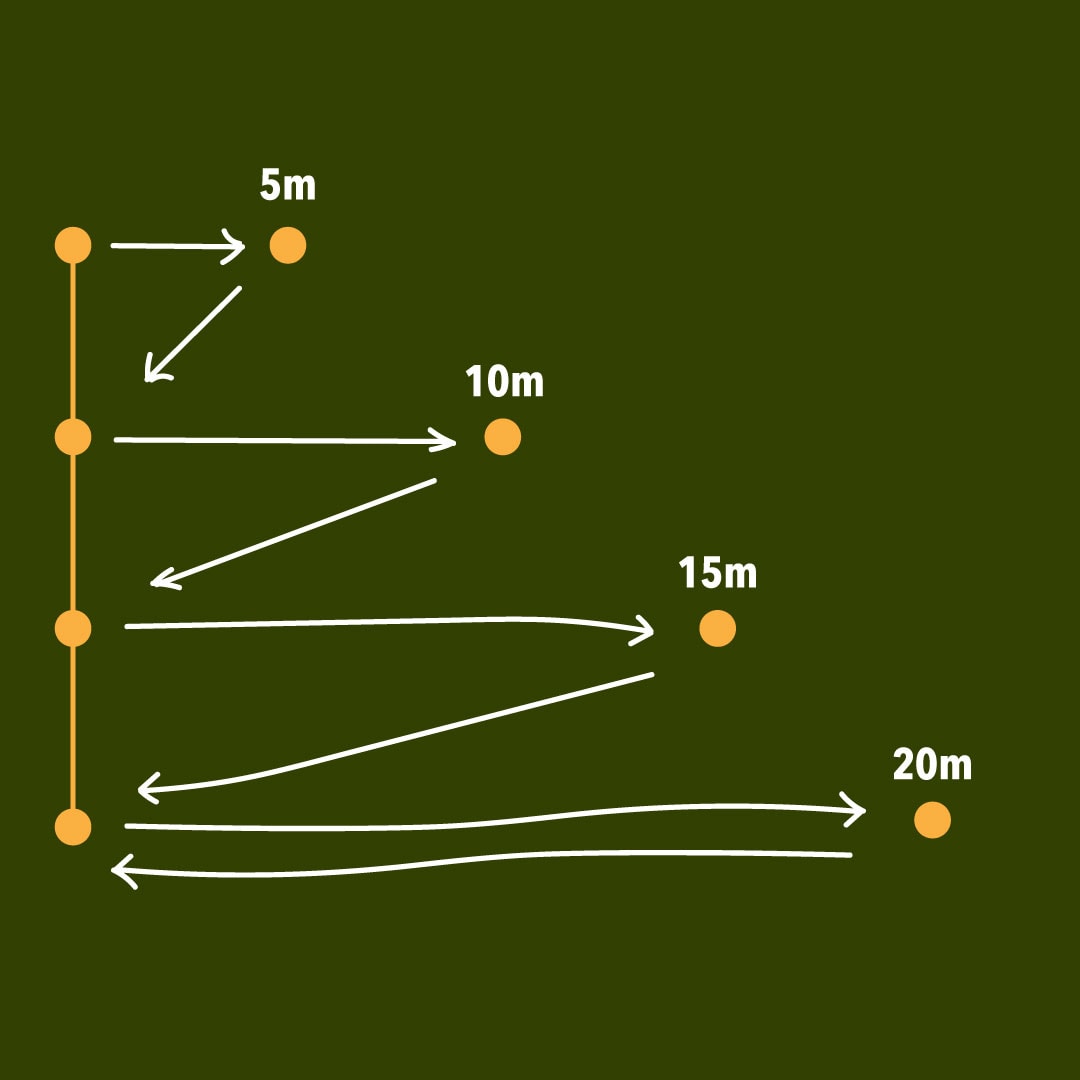
Lack of space does not have to stop you from working on your speed, agility, and fitness. In fact, with this drill, you can develop a host of rugby fitness components in just 20m of space. Set up your cones, as shown below.
Run out to the first marker and then back. Immediately turn and run out to the second marker and back. Continue out to the third marker and back, and finally out to the fourth marker and back. Congratulations – you have just run 100m! Rest for 60 to 90 seconds and then repeat.
If you are after sprinting quality as well as quantity, perform three sprints, rest five mins, perform another three sprints, rest a further five minutes, and then perform a final set of three. The longer rests should mean that you can maintain a faster sprinting speed throughout the entire workout.

Sprinting and agility are not just matters of fitness, technique also has a part to play. Try to practice (and remember) the following when you train for speed and agility.
Most people run using a heel-toe action. That’s fine for distance running but not so good for speed. Every time you land on your heels, you effectively put on the brakes, especially if your leg is extended out in front of you.
One way to learn to run more on your toes is to train barefoot or wearing minimalist shoes. Without shock-absorbing shoes, you are much less likely to land heavily on your heels. Introduce this type of training gradually to avoid injuries, especially if you are used to wearing built-up running shoes.
Sprinting is a lot like golf; the harder you try, the worse your performance will be. As soon as you start to tense up, you’ll reduce your range of motion, making your movements shorter and less economical.
If you watch top sprinters in slow motion, you’ll see they are the very image of relaxation. Their shoulders and necks are relaxed, their faces are slack, there is very little tension in their arms or hands; they all-but flow along the track.
Emulate the great sprinters by consciously relaxing when you sprint – both in training and competition. Imagine you are holding eggshells in your hands and keep them relaxed. This will help relax your entire upper body. Do not clench your fists or jaw, screw up your face, or hunch your shoulders – even if you are tired or trying to reach top speed.
Sprinting is about more than pure strength and power; it also requires proper technique. There are several drills you can do to improve your sprinting form that should transfer to increased speed.
Want to sprint faster? Hills can help. A lot of people do hill sprints for fat burning and fit- ness, but hill sprints for speed require a different approach. Traditional “fitness” hill sprints could actually make you slower.
Uphill sprints – to increase leg power and sprint speed, find a hill with a very slight in- cline. Why slight? Because a steep slope will alter your running technique, shorten your stride length, and force you to slow down.
According to the exercise law of specificity, the way you train dictates how your body responds to your workouts. If your workout forces you to slow down, you’ll end up training yourself to sprint more slowly; the opposite of what you want. To avoid this, make sure you can outsprint the hill, i.e. you reach the top at full speed.
Downhill sprints – to increase leg speed, find a very slight hill and run down it as fast as you can. Make sure you don’t have to brake as this will negate the benefit of the exercise. The slight decline will force your legs to turn over more quickly, and faster legs mean increased sprint speed.
If touch rugby is your game of choice, you’ll be glad to hear you don’t need to spend hours in the gym building muscle and getting strong. Because touch is a semi-contact sport, with no tackles, scrums, rucks, or mauls, you don’t need the strength of a full-contact rugby player.
However, that doesn’t mean you won’t play better if you have at least an above-average level of strength and power.
Strength, the production of force irrespective of speed, will help you sprint faster, jump higher, and change direction more quickly. It will also help make you more injury-resistant as strong muscles help keep your joints correctly aligned.
Power is strength expressed at speed. Increasing muscle power will also boost sprinting and jumping performance and help make you more agile and better able to change direction.
The best place to develop strength and power is in the gym. Most gyms contain all the equipment you need to train in relatively safety. However, you can also develop a reasonable level of strength and power by training at home.
Here are two workouts for developing strength and power for touch rugby. Do each workout once per week, preferably with a couple of days in between for recovery, e.g., Monday and Thursday.
Not sure how to do any of the exercises? Take a look on YouTube or ask your friendly, neighborhood gym instructor, or personal trainer for advice. If any of these exercises are new to you, make sure you take time to master them using light weights before doing them with maximal effort.
No gym? No problem! You can develop a decent level of strength and power in the comfort of your home or garden. Good exercise options include:
Strength and power training will help make you a better touch rugby player, but there is no need to spend more than a couple of hours in the gym per week – unless you want to of course! Instead, build your weekly training schedule around fitness, speed, and agility training, doing just enough strength and power work to maximize your performance and reduce your risk of injury.
Whatever workout you have just completed, it can be tempting to collapse in a heap, hit the showers, or grab something to eat and head home when you are done. While you probably deserve all of the above, doing so can undermine your recovery.
When you train, your body undergoes a lot of stress. Some of that stress has a negative effect. Until balance is restored, your body cannot get on with the process of recovering from your workout.
Cooling down helps get your body back into its pre-training state so that recovery can happen as soon as possible. The faster you recover, the sooner you can get back to train- ing, and the faster your progress will be.
Ten minutes spent cooling down will not only speed up recovery, but it’ll also help pre- vent post-exercise muscle soreness and tightness. Given that even touch rugby players are all-too-quick to complain about aches and pains, this is time well spent.
A good cool down should contain a couple of different elements:
The pulse lowerer aims to increase general circulation and re-oxygenate your muscles. This will flush out the byproducts of intense training, namely lactic acid. Lactic acid levels will drop naturally, but the sooner you are lactate-free, the sooner your resources can be directed to toward recovery.
To lower your pulse, simply do some cardio that, over several minutes, gradually gets easier. For example, run, jog, and then walk over 5-10 minutes. You should end your pulse lowerer feeling refreshed and with your heart and breathing rate being back to normal.
Don’t worry about sport specificity at this point – it’s not important. You can cool down on an exercise bike, a rower, a cross-trainer, or any other cardio exercise available. If you are outdoors, having just done a speed and agility session, the run, jog, walk option is your best choice.
Once your heart and breathing rate is back to normal, it’s time to stretch your hard- worked muscles. Intense training can cause something called adaptive shortening. This means your muscles adapt to the range of motion through which they have just been worked. If, for example, you spent the last 40 minutes running, your muscles will tend to shorten to reflect that range of motion.
Stretching after training will help restore lost flexibility and even improve it. Flexibility is important for a host of reasons, from better posture to a reduced risk of injury. Very few ruggers can claim to be too flexible! A few minutes stretching is time well spent. For the sake of simplicity, start stretching at your feet and work up your body, or at your head and work down. That way, you’ll stretch all your major muscles and won’t inadvertently leave any out.
If a muscle feels tight, or you have just worked it especially hard, hold your chosen stretch for 30-60 seconds, deepening the stretch as you feel your muscles relax. In contrast, if the muscle you are stretching feels loose and pliable already, just stretch it for 10-20 seconds.
Make sure you stretch the following muscle groups:
Whatever muscle you are stretching, ease off if it starts to shake or you feel any burning. Stretching should feel mildly uncomfortable but never painful. Breathe as you stretch to facilitate relaxation and a deeper stretch.
If you have time, foam rolling is a great way to bring any workout to a close. It’s like having a vigorous rubdown from a masseuse without having to go to the spa! Foam rolling helps release tension from your muscles and frees up your fascia. Fascia is the connective tissue that surrounds and separates your muscles like saran wrap. It can become gummed up and adhere to the underlying muscle tissues, causing pain and reducing mobility.
Foam rolling is initially painful, but, after a few sessions, is actually quite relaxing. It’s an excellent way to work out the kinks and knots caused by intense training. Foam roll all of your major muscles while avoiding areas that are bruised or very sore. Also, avoid rolling bony prominences and joints.
If you are new to foam rolling, start off easy by taking more weight on your hands and arms. As you start to become more accustomed, feel free to put more weight on your roller to get a more profound effect. If you don’t have time to foam roll your entire body, focus on the areas that are most likely to be tight, especially the adductors (outer thighs), glutes and hamstrings and back.
Time spent cooling down may seem like time wasted, but those extra few minutes could speed up recovery, actually saving you time in the process. Just ten extra minutes can have a significant impact on your future performance and progress.
Touch rugby might have started as a training tool for full-contact rugby, or even as a game for kids, but it’s now a game that is played and beloved by ruggers all around the world. It’s fast-paced, fun, and very safe, which makes it the perfect introduction to rugby or a great way to stay in the game if injuries or age have taken their toll on your body.
Get the most out of touch rugby by working on your fitness, speed, and agility. Simply playing touch rugby will help develop these fitness characteristics but, if you want to play at your best and leave the opposition in your wake, a few touch rugby-specific training sessions are just what the coach ordered.
Touch rugby might be the full-contact game’s younger, less intense relative, but that doesn’t mean you can’t take it seriously if you want to. If you are going to play touch rugby, why not play to win?!
The materials and information provided in this presentation, document and/or any other communication (“Communication”) from Ruck Science, LLC or any related entity or person (collectively “Ruck Science”) are strictly for informational purposes only and are not intended for use as diagnosis, prevention or treatment of a health problem or as a substitute for consulting a qualified medical professional. Some of the concepts presented herein may be theoretical.
References to any non-Ruck Science entity, product, service, person or source of information in this or any other Communication should not be considered an endorsement, either direct or implied, by the host, presenter or distributor of the Communication. The host(s), presenter(s) and/or distributor(s) of this Communication are not responsible for the content of any non-Ruck Science internet pages referenced in the Communication. Ruck Science is not liable or responsible for any advice, course of treatment, diagnosis or any other information or services you chose to follow without consulting a qualified medical professional. Before starting any new diet and/or exercise program, always be sure to check with your qualified medical professional. For details of our affiliate program please see our Terms & Conditions. Click here for our Privacy Policy