

Not a staging-rucksciencecom.kinsta.cloud member? That’s ok, just tell us where to send the program or register for a free account.
As a staging-rucksciencecom.kinsta.cloud member, you have unlimited access to the .PDF version of our in-season backs program.
This rugby training program is designed for everyone who runs fast and scores tries. Backs don’t (and shouldn’t) train like Forwards. For those more agile players, you’re going to focus on getting running, stopping and turning faster than you did yesterday. Our In-season program for Backs is aimed to getting you through more gaps and scoring more points than ever before. You can also find it on the world’s #1 rated rugby training app.
With the rugby season in full swing, you should be enjoying the fruits of your off and pre-season training efforts. After all, that’s when you can make the biggest impact on your fitness, strength, power, and performance. With no big games to prepare for or recover from, you should have had lots of time energy to dedicate to both training and recovery.
But, does that mean that, now the season is upon you, that you cannot make improvements in your rugby-specific fitness? Are you doomed to maintaining the same level of fitness for the rest of the season or, worse still, trying to play yourself fit? Hell no!
Playing competitive rugby can highlight areas of your fitness that need to be improved. In fact, a rugby match is the perfect test of rugby-specific conditioning. Once you have identified any weaknesses, you should be able to address them in the coming weeks and months, even though you have to balance your training with the demands of the competitive season.
You won’t be able to follow a full-on training program – that’s impractical as you’ll be playing most weekends, will need to recover from your most recent game, and will still have to show up to team training a couple of times a week too.
But that doesn’t mean you can’t strengthen your fitness weak links.
In fact, because you’ll only have limited time for extra training, you’ll be forced to focus on getting the most from each and every training session you do, and that’s a good way to improve performance fast. There is nothing like short, focused training sessions to concentrate your mind and make you emphasize workout quality over quantity.
However, because of limited time for training and recovery, you are going to have to prioritize your time and energy. Realistically, you won’t be able to fix multiple areas at the same time; you’re going to have to pick and fix one area at a time.
Remember, this is the time to strengthen weak links, not build a brand-new chain!
Because of this, you’ll need to do a little self-analysis and honestly assess your current performance. There’s questionnaire in the next chapter to help you with this. In most cases, this will simply reinforce what you already know – the areas of your fitness that need work.
Armed with this information, you’ll can then dedicate two training sessions a week to fixing the area that need the most attention. Two sessions per week might not sound like much but it’s important to balance extra training with the demands of playing and recovering from rugby games, plus your twice-weekly team practices.
As the season progresses, you should find that your weak link turns into a strong one, leaving you free to either switch into maintenance mode or move on to something else you want to improve.
Remember though, playing rugby and training hard take a lot out of your body, so you need to make sure you consider rest and diet as well as training. A healthy diet can help, as can using supplements designed specifically for rugby.
To facilitate proper recovery, make sure you:
For more details on the importance of and how to speed up recovery, check out our FREE e-book 10 recovery programs for the day after a rugby game.
In-season training should complement and gradually improve your playing performance. If you notice your performance dropping, you probably aren’t paying enough attention to recovery. Revisit recovery to make sure you don’t end up earning yourself a place on the reserves bench!
You’ve probably got more than a sneaking idea of what your current fitness weak links are. They’re the things you currently aren’t doing as well as you should, or as well as your teammates.
However, if you aren’t prone to introspection, answer these questions to determine what aspects you need to work on.
If you aren’t sure if you have answered the questions honestly, ask one of your teammates or even your coach. They will have seen you in action and will probably have noticed areas where you need improvement.
Armed with this information, you should now get to work turning your weakness into a strength or, at the very least, less of a liability.
Strength and power are different muscular fitness components but are similar enough that they can be trained at the same time. Where strength is all about maximal load, power is all about maximal velocity. Strength and power are also very closely related; the stronger you are the greater your power potential is, and the more powerful you are, the greater your strength potential is. It really makes sense to train both these components at the same time.
Two strength/power sessions a week might not sound like a lot but it’s actually more than enough when you consider the demands of playing and practicing rugby. It’s also important to differentiate between training for strength and power, and training for hypertrophy.
Hypertrophy or bodybuilding usual involves time-consuming split routines where muscles are trained once or twice per week. While effective for building muscle, this is not the best way to increase strength and power.
In contrast, developing strength and power for rugby is best achieved using whole body workouts, focusing more on training quality and intensity instead of volume. Short but hard workouts will trigger the improvements you want but without the need for lots of recovery. This makes whole body workouts ideal for not only this phase of training but rugby strength training in general.
As an added bonus, where hypertrophy training increases muscle size but rarely does much for strength or power, strength and power training will increase muscle size. It’s a much more efficient use of your time and energy.
Here are your two strength and power workouts. Do them several days apart e.g. Monday and Thursday.
Precede each workout with a few minutes of light cardio plus some dynamic mobility and flexibility exercises. Also do a couple of sets of each exercise using an empty bar or light dumbbells to fully prepare your body for what is to come.
These workouts use complex supersets. With this method, strength and power exercises are combined so that you can a) train multiple muscle fitness components at the same time and b) increase your performance in both types of training.
Perform a heavy set of the designated strength exercise using around 90% of your 1RM. After a 3 to 4-minute rest, then perform the corresponding power exercise.
Because of something called post-activation potentiation, or PAP for short, you’ll be able to generate more force in the power exercise than normal. The power exercise will further excite your nervous system so that you can then, after another 3-4 minutes rest, perform better in the strength exercise.
If you feel okay, feel free to increase the weights for either or both exercises set by set. However, make sure you terminate the power exercise as soon as you notice you are starting to slow down or your performance is otherwise declining. Think quality and not quantity; this ain’t no CrossFit workout!
For exercises 3 & 4 of each program, do as many reps as you can, rest EXACTLY 60 seconds, and then crank out another max rep set. Select a load that limits you to around 8-12 reps for your initial set. Because you are tired you won’t be able to do as many reps. Rest another 60 seconds and go again. Keep going until you are unable to do 50% of reps you did in the first set.
For example:
1. 10 reps
Rest 60 seconds
2. 8 reps
Rest 60 seconds
3. 7 reps
Rest 60 seconds
4. 5 reps
Rest 60 seconds
5. 4 reps (and done)
This method introduces an element of self-regulation to your workouts. If you are feeling good, it will take you more sets to reach the cutoff point. If, however, you are still feeling the effects of your last game or training session, you’ll fatigue sooner and will need fewer sets to reach the 50% point.
Perform the final two core exercises back-to-back as a superset. This will save time and also produce a better workout. Do the first exercise and then, without resting, immediately do the second exercise. Rest for the prescribed duration and then repeat the pairing.
Increase your weights from one week to the next, or as often as you are able. Even the smallest increase will help improve your strength and power. It may be a good idea to buy some micro plates that weigh 2.5 lbs (1kg) and 5 lbs (2.5kg) as a lot of gyms only offer standard issue increment plates and these can sometimes be too big an increase.
Strength and power training do not need to be complicated or lengthy to produce results. And nor should it be if you also have to contend with the demands of playing and training for rugby. Give each workout your all and you will get stronger and more powerful, despite their simplicity and brevity.
Endurance can mean several things but, in simple terms, it’s your ability to resist fatigue. If you often find yourself dragging ass behind your teammates, are the last one to arrive at the set plays or are always counting down the minutes until the final whistle, you need more endurance.
Endurance is the combination of aerobic and anaerobic fitness. The two are inextricably linked and it’s all-but impossible to improve one without the other.
Aerobic fitness is the ability of your body to take in, transport, and utilize oxygen. The more oxygen you can get into your body, the later you’ll need to make the switch to the anaerobic energy pathways, and the sooner you’ll recovery from anaerobic activities like tackling and sprinting.
Anaerobic fitness is your ability to generate energy without oxygen. As mentioned, the fitter you are aerobically, the later this system will come into play. Also, the higher your anaerobic fitness is, the less lactic acid will be produced.
Because of the interaction of these two systems, it makes sense to try and work on both aerobic and anaerobic fitness if your endurance is what you need to improve.
Here are your two endurance workouts. Workout one should be done in a gym, while workout two should be done on a rugby pitch. Do the workouts several days apart e.g. Monday and Thursday. Each workout comprises of three parts so make sure you do them all.
Precede each workout with 5-10 minutes of light cardio followed by some dynamic mobility and flexibility exercises to make sure your body is ready for what is to come.
Your first exercise targets your creatine phosphate energy system. This system produces a short burst of energy for very intense activity. Using a rower, sprint flat out for 10 seconds and then rest for 20 seconds. Repeat eight times to total four minutes. Do your best to cover the same distance for all intervals. Set the resistance on high to give yourself plenty to pull against. No rower? Do sumo deadlift high-pulls or burpees instead.
400-meters is a horrible interval training distance. It’s a bit too far to be considered a pure sprint but, on the other hand, it’s not so far that you can’t give it plenty of high-intensity effort.
On a treadmill or a running track, start your stopwatch and run 400 meters as fast as you can. Rest until your timer says three minutes and then go again. Do your next set when the timer reaches six minutes, and your final set when it reaches nine minutes.
Your final exercise is as much a gut-check as it is a way to develop your aerobic fitness. Row or run 5k (5,000 meters) as fast as you can but while staying within your aerobic training zone. That means you should still be able to control your breathing and talk while you exercise, albeit only just. If you have to slow down at any point, you were going too fast.

For your final task, simply run one mile (1600 meters) as fast as you can while staying within your aerobic zone. Run laps of the pitch or a measured mile as preferred. Alternately, run four laps of a standard running track.
Finish your endurance workouts with a few more minutes of light cardio and then stretch your major muscles, especially your legs. This will enhance recovery and will also help ward off stiffness while promoting increased flexibility.
Combined with weekly rugby matches and twice a week team training, these workouts will soon start to have a noticeable impact on your endurance. To ensure you make good progress, try and go a little faster from one week to the next, compressing more exercise into the same time frame.
Prehab and rehab are very similar types of training. In fact, they often involve doing the same exercises. The main differenceis their timing – prehab is done to reduce your risk of injury, whereas rehab is done to hasten recovery, prevent an injury happing again, and is performed after the fact.
Most ruggers have to deal with injuries; its part and parcel of such a physical sport. In a lot of cases, rugby players just play on through injury, and use tape or modify their workouts or techniques to accommodate their various aches and pains.
A brief break from training and playing can also help rid you of your injuries, or at least allow time for the pain to subside, but ruggers are a tenacious, determined bunch and are mostly loath to take time off. After all, your place on the team is not guaranteed and if you can’t play, you may be replaced.
Most players need at least some prehab and rehab but, because of their ongoing training and playing commitments, fail to do it. That means that aches and pains can accumulate as the season goes on so that, by the time the last game rolls around, it’s like watching a scene from The Walking Dead TV show!
If you are feeling very banged up, it may be necessary to forgo some other types of training so that you can get a handle on your aches and pains. While this does mean you might lose a little strength or fitness, you’ll lose a lot more if you are injured and unable to train or play at all.
Here are two general prehab/rehab workouts for you to use. Do them on non-consecutive days e.g. Monday and Thursday.
If you need more detailed information about prehab and rehab, make sure you check out our FREE e-book Prehab for rugby – a joint by joint approach.
Precede each workout with 5-10 minutes of light cardio followed by some dynamic mobility and flexibility exercises to make sure your body is ready for what is to come.
Foam rolling is a form of self-massage that frees up your fascia. Fascia is, in simple terms, the tissue the covers your muscles keeps them separate. If you don’t have a foam roller head out and buy one; they only cost about $20.00. Once you have your roller, you just lie down so the muscle you want to treat is on top and then roll along the length of the muscle to release any tension or adhesions.
Make sure you cover all your major muscles including your calves, hamstrings, quadriceps, glutes, upper back, lats, and your chest. Roll each muscle 12-20 times, spending more time on any “hot spots.”
Weak glutes can have a big impact on knee and hip stability. Joint instability is a leading cause of injury. Strengthen your glutes with this simple exercise. Lie on your back with your legs bent and feet flat on the floor. Push your hips up toward the ceiling until your knees, hips, and shoulders form a straight line. Lower your butt back down to the floor and repeat. Too easy? Tie a resistance band around your knees, hold a weight across your hips, or use one leg at a time.
The muscles between your shoulder blades are called the rhomboids and middle trapezius. They help stabilize your shoulder girdle which means your shoulder joints have a stronger platform from which to work. Keep these muscles in good shape by performing face pulls.
Stand facing an adjustable cable machine set to around chin-height. Attach a rope-type handle. Grab the handle and, with straight arms, step back to tension the cable. Using a split stance for balance, pull the ends of the handles in toward your ears. Keep your elbows up, shoulders down and relaxed. Extend your arms and repeat.
This exercise works best with light to moderate weights and a slow tempo. Too much weight will make you use muscles other than the mid-traps and rhomboids.
This exercise is a favorite of Olympic weightlifters and works several shoulder functions all at once.
Hold a barbell with an overhand, slightly wider-than-shoulder-width grip. Keeping your elbows above your hands, do a half-range upright row to chest. Next, rotate your arms out and away from your body until the bar is level with your forehead. Then, press the bar up and overhead to arms’ length. Lower the bar by reversing this movement. Use light weights to avoid using muscles other than those targeted.
As above.
Rugby is not a predictable game, and so you need to be able to establish stability in a more dynamic way. The more stable you are, the less injury prone you’ll become.
Mark a one-meter by one-meter grid on the floor that looks like this:

From left to right and top row to bottom, number each square one through to nine. Stand on one leg in any square of your choosing. Ask a training partner to call out any number other than the square in which you are stood. Hop to that box and try to stick your landing with minimal wobbling. Your partner should then select another square.
Continue hopping from one designated square to the next until you have completed 6-10 jumps. Change legs and repeat. Make this exercise more demanding by adding mid-air turns of 90, 180, or even 270-degrees or by simultaneously passing and catching a rugby ball.
Dead bugs teach you to use your deep abdominal muscles to stabilize your pelvis and lower back when you are otherwise busy moving your arms and legs. Lie on your back with your knees bent, thighs perpendicular to the floor. Extend your arms straight up to the ceiling. Brace your abs and then slowly extend and lower one leg to just above the floor, while extending your opposite arm overhead.
Do not allow your lower back to move – not even an inch. Slowly return to the starting position and repeat on the opposite side.
Using nothing more than a resistance band, this exercise is ideal for doing at home. In fact, every rugby player should do one hundred reps of this exercise over the course of a day to keep their shoulders healthy.
Hold a resistance band up in front of your face. Keeping your arms straight, open your arms and stretch the band across your chest – just like you were using an old-fashioned chest expander. Bring your arms back together and repeat.
This exercise complex works your shoulder joint and shoulder girdle and is a time-efficient way to develop and maintain good shoulder health.
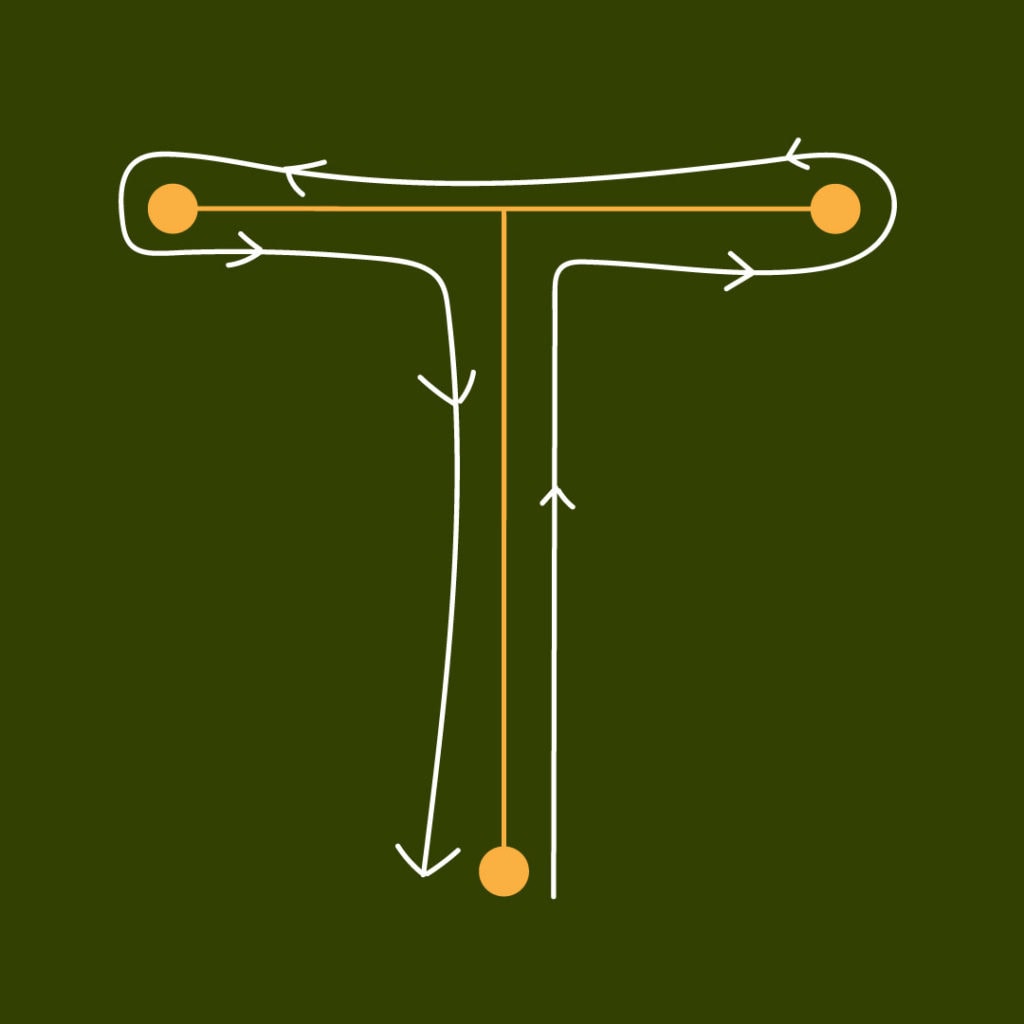
Lie on your front on an exercise bench set to around 30 degrees, your head at the high end. Hold a dumbbell in each hand with your arms hanging down toward the floor. With your thumbs pointing forward, raise your arms up until your biceps are next to your head. Lower your arms and repeat.
From behind, your body should look a little like the letter “I.”
Next, raise your arms forward but, this time, so that your upper arms are approximately 45-degrees to your body. Lower your arms and repeat. From behind, your body should look a little like the letter “Y.”
Finally, raise your arms out to your sides, so your upper arms are perpendicular to your body. Lower your arms and repeat. From behind, your body should look a little like the letter “T.”
As above.
Prehab can save you a lot of time on the reserves bench and doing your rehab can get you of the injured list quicker. When it comes to injuries, don’t just sit back and hope for the best – be proactive. The same is true for recovering after injury. If you are feeling banged up or want to avoid losing valuable playing time to otherwise avoidable injuries, add these two workouts to your weekly training schedule.
Recovery is a big part of the rugby success equation. What playing and training take out of your body, you must put back in so that you can do it all over again – often just a day or two afterward. Incomplete or slow recovery will severely hamper your performance – both on the pitch and in the gym.
While recovery will happen naturally, you’ll recover quicker if you take a more active role. Playing rugby at weekends, twice- weekly team practices, and whatever other workouts you need to do per week mean that speedy recovery is not just desirable, it’s necessary.
Rest days between bouts of physical activity are essential but rest does not mean being sedentary. In fact, if you just sit around waiting for recovery to happen, it’ll end up taking longer.
There are lots of ways you can actively speed up your recovery, and you’ll find more information on this topic in our FREE e-book 10 Recovery programs for the day after a rugby game.
Here are two workouts you can use to speed up recovery. Use one the day after your weekend match and the other after your last team training session of the week. Both workouts can be completed at home with nothing more than a skipping rope, an exercise band, a workout mat, and a pair of light dumbbells.
Note: these workouts are circuits. Do one set of each exercise to a) avoid overloading any one particular muscle group and b) increase blood flow around your entire body. There is no need to rush between exercises, and you should not feel fatigued after any of the exercises or circuits. Just focus on moving your body rather than overloading your muscles.
Jumping rope is a good way to get your body moving and your blood pumping. Grab a rope and skip for 60 seconds. Try to keep your shoulders relaxed and maintain a steady rhythm. Land as lightly as you can and stay on your toes. Can’t jump rope? Do step ups or jog in the spot instead.
This yoga sequence will help mobilize and stretch all your major muscles and joints. It’s a great way to work out any stiffness or soreness. Perform the following sequence slowly and under control, moving in time with your breaths.
Learn more about applying yoga to rugby here.
This exercise is a good way to loosen up and mobilize your hips and lower body.
Stand with your back to a low chair or knee-high step. Bend one leg and place your foot on the step behind you. Hop forward into a staggered stance. Bend your legs and lower your knee to within an inch of the floor. Place a cushion under your knee if required. Stand back up and repeat.
Do the same number of reps on each leg. Concentrate on the range of movement rather than hammering your quads; this is an active stretch and not a muscle builder.
This exercise mobilizes and stretches your upper body while pumping freshly oxygenated blood into your muscles which will enhance recovery. It also provides another good hamstring stretch.
Place your hands on the floor, about shoulder width apart. Your feet should be roughly shoulder-width apart too and your butt in the air. Bend your arms and lower your shoulders down until your chest almost touches the floor. Next, while keeping your hips down, push your body upward, so your chest is up, your back arched, head up and arms straight. Hold the position for a second and then reverse the movement to return to the inverted “V” starting position. The motion should look as if you are “dive bombing” under a low bar from the top position.
This gentle exercise works your lower back and other postural muscles which you’ll probably need after a hard game of rugby. It also provides an excellent active stretch for your chest and shoulders.
Lie on your front with your hands flat on the floor on either side of your head. Keeping your legs straight and feet down, lift your upper body and arms off the floor. Next, sweep your arms back and touch your thighs with your hands and then return to the starting position. Lower your chest and arms back to the floor and then repeat.
Fire up your upper back, mobilize your shoulders and stretch your chest and lats all at the same time. Use light weights, just a couple of kilos, because this exercise is harder than it sounds.
Raise and hold a light dumbbell in each hand at shoulder level. Bend your knees slightly and then lean forward so your body is inclined to around 45-degrees. Do not round your lower back. Maintain this position and then press your arms out and overhead, keeping them aligned with your body. Lower your arms and repeat.
Mobilize your lower back to relieve stiffness and pain, an all-too common issue after rugby.
Kneel on all fours with your hips directly over your knees and your shoulders over your hands. Arch your spine and imagine trying to touch the ceiling with the center of your back, looking down and back at your knees as you do so. Next, lower your back and try and push your belly down toward the floor. Lift your head and look up at the same time. Smoothly alternate between humping and hollowing your back to mobilize your spine.
Use the following methods to further enhance recovery:
Go for a walk – a brisk walk will pump freshly oxygenated blood all around your body, dissipating the waste products of intense exercise, especially
in your legs. 20-30 minutes is more than enough to speed up recovery without tiring you out.
Get a massage – this is not the time for a deep tissue massage. That will at best be very painful, and at worst delay the recovery process. Instead, have a superficial Swedish-type massage that enhances circulation, relaxation, and lymphatic drainage.
Go for a swim – a relaxing swim in cool water will help mobilize your joints while reducing the inflammation that causes muscle pain. Focus on long, smooth strokes rather than trying to swim fast or a long way.
Contrast temperature therapy – alternate between hot and cold showers or baths to increase micro-circulation, oxygenate your muscles, and speed up recovery by flushing away the waste products produced during intense exercise.
Wear compression clothing – wearing compression garments may improve recovery by limiting post-activity swelling and inflammation. This is achieved by preventing fluid accumulation in and around muscle tissue and therefore minimizing bruising. Compression clothing also increases tissue temperature which can help ease aches and pains and increase mobility and flexibility while reducing the onset of DOMS. Wear compression garments for 24 hours after intense training or rugby matches.
Get more sleep – your body does most of its recovering while you sleep. If you are putting your body through a lot of physical stress, make sure you increase your nightly sleep quota to ensure your body gets the added time it needs to recover fully.
Supplements – supplements can play a meaningful role in post-rugby recovery. There are many supplements to choose from but the best items for recovery include:
Whey protein – rugby is a catabolic activity which means it causes muscle breakdown. Repairing this damage requires protein. Whey protein is rapidly digested, so it gives your muscles what they need as soon as possible. Because it is mixed with water, it is easy to consume immediately after your game and any other time that solid food may be inconvenient.
Branch chain amino acids – the branch chain amino acids (BCAAs) are leucine, isoleucine, and valine and make up 70% of muscle tissue. These amino acids are heavily catabolized during intense activities like rugby. Consuming BCAAs immediately and during the days after a tough game will help your muscles recover faster. They may also reduce the severity and duration of delayed onset muscle soreness.
Glutamine – glutamine is the most abundant amino acid in the body and as such performs several vital functions including growth, repair, and recovery of muscle mass. Glutamine also plays a key role in the replenishment of glycogen stores.
Fish Oils – fish oils, from the omega three fatty acid group, are naturally anti-inflammatory and can help reduce post-match muscle and joint pain. The regular supplementation of fish oils can also improve heart and brain function.
Creatine – creatine is a very popular, well- researched and cheap supplement that plays a vital role in the production of energy within your muscles. Supplementation with creatine can increase your energy reserves and enhance recovery. Add five grams of creatine to your post-match carb drink to kick start recovery.
ZMA – comprising of zinc, magnesium, and vitamin B6, ZMA is a safe sleep aid that also increases anabolic hormone production.
L-Arginine – this isolated amino acid is an effective vasodilator that opens blood vessels allowing more oxygenated blood to enter your muscles. This will enhance recovery by flushing out lactic acid.
Don’t leave recovery to chance; take a more active role to ensure you recover as quickly and as completely as possible. That way you’ll be better prepared for your next rugby match, training session, or team practice. The older you are, the slower recovery tends to be, so make sure you take recovery seriously if you are getting a little long in the tooth.
It’s never too late to improve your fitness for rugby – even if the season is in full swing! However, with limited time and energy, it’s crucial that you focus on workout quality rather than workout volume. After all, most of your time and energy should be dedicated to playing rugby.
Do some self-analysis, identify the area you need to improve, and then dedicate two short training sessions per week to addressing your weak link. With a little dedication, what was holding you back at the start of season could become a major strength as the season draws to a close.
The materials and information provided in this presentation, document and/or any other communication (“Communication”) from Ruck Science, LLC or any related entity or person (collectively “Ruck Science”) are strictly for informational purposes only and are not intended for use as diagnosis, prevention or treatment of a health problem or as a substitute for consulting a qualified medical professional. Some of the concepts presented herein may be theoretical.
References to any non-Ruck Science entity, product, service, person or source of information in this or any other Communication should not be considered an endorsement, either direct or implied, by the host, presenter or distributor of the Communication. The host(s), presenter(s) and/or distributor(s) of this Communication are not responsible for the content of any non-Ruck Science internet pages referenced in the Communication. Ruck Science is not liable or responsible for any advice, course of treatment, diagnosis or any other information or services you chose to follow without consulting a qualified medical professional. Before starting any new diet and/or exercise program, always be sure to check with your qualified medical professional. For details of our affiliate program please see our Terms & Conditions. Click here for our Privacy Policy