
This post explains how to become a more powerful player by adhering to what we consider the best rugby leg workout program available.
If you read on, we’ll explain why power is important for rugby players, how to train to be more powerful and how to recover faster from leg workouts so that you can go again.
Throughout the article, we will link to external resources, technical videos and peer-reviewed research on leg workouts. If you already understand that leg power is important for rugby players and you just want to start lifting, scroll down the page to find the best rugby leg workout broken down by day, set and timing and post-workout nutrition.
Not to be confused with Strength, Power is your ability to move weight over time. The basic formula for power is: POWER = WORK / TIME. In non-math speak, the faster you can move the same amount of weight, the more power you exert. So it stands to reason that there are two main ways to become more powerful: #1 get stronger and #2 get faster. Power lifter David Hansen has a pretty simple way to distinguish between strength and power:
Strength is your ability to lift heavy things. Power is the ability to lift them fast. They are both very closely related. The best way to increase your power (speed) is to get strong (strength). It is impossible to be fast and weak. If you can deadlift 200 pounds, then you are slow because you are weak—not because you don’t do box jumps and shit like that.
The most powerful players on a rugby field are often the best. High-level rugby requires significant endurance, agility and technical skill. But all other things being equal, the most powerful player usually wins the physical contest in a tackle, ruck or scrum. For ruggers of all backgrounds, abilities and ages, increasing your power is a virtual guarantee that you’ll become a better rugby player. Being powerful makes every task around the field easier, from lifting in lineouts, to clearing rucks and chasing kicks. Power matters because rugby is a sport for powerful people.
The #1 reason is you’ll improve your strength and power dramatically. The #2 reason is that you’re going to feel absolutely excellent after your weight training. This leg program doesn’t include 8 / 10 / 12 or more repetitions in each set. In fact, we specifically want to try and avoid fatigue within each set so that we’re fresh for the next one. Doing many heavy sets will help you avoid the days-long fatigue that follows 10 rep mid-weight sets. This program is not about hypertrophy. If you’re looking to bulk up, choose another of our programs. But for pure functional power on the rugby field, this leg program is the best.
This leg workout program includes just 4 exercises. Notable exclusions are the Dead Lift, Romanian Dead Lift, Power Clean and Snatch. Why did we leave these out? This workout is highly-focused on building strength and speed. Those other exercises incorporate an upper-body component.
Olympic movements like the Snatch and Power Clean are also much higher-risk for the average rugby player. In this leg program, rugby players will focus on generating power through heavy weighted squats and explosive box jumps. You’ll notice that this ties directly back to the elements of power outlined above. Our goal with this leg program is to increase both strength and speed simultaneously, keeping workouts less than 40 mins (the length of one half of a rugby game).
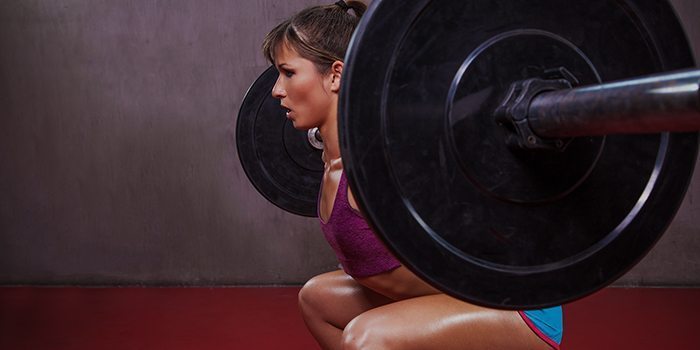
The back squat is the most fundamental of all weighted leg workouts. If you’ve never done a squat before, read this excellent post by the guys at Strong First which will explain how to make space in your squat. When you’ve got your technique down, the leg workout below will make your legs stronger, faster than most any over regime out there. But creating powerful legs all starts with the back barbell squat. That’s why it makes up the core of our rugby leg workout for power.
One of the advantages of the program below is that you’ll get plenty of practice setting up your back squat. Almost all the bad tendencies that people develop in the squat rack come from a poor setup. At the moment you take the bar off the rack, your body should be under the same amount of tension you’ll be using throughout the squat. Far too often we see rugby players take the bar off in a loose, lackadaisical manner. The result is that their backs aren’t arched correctly, their shoulders are rounded and their feet are too narrow when they start their first squat.
When setting up your squat, your body should be perfectly tense and aligned as you move up under the bar for the first time. This gives you the correct shape. Kettlebell pioneer Pavel Tsatsouline, explains that lifting weights should always be considered “practice”. The word “practice” as opposed to “workout” denotes improvement in both form and strength. Every time you get under the squat bar, you’re practicing the setup process. Don’t just get under there and lift the thing. Practice setting up correctly and giving yourself the best possible chance to succeed. Take pride in your technique as much as in your 1RM.
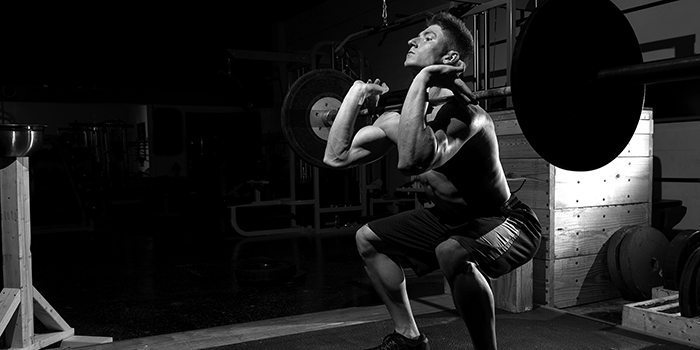
The guys at Strong First are all about the front squat. And it makes sense for rugby players to learn to love this movement. The front squat provides all the same benefits of the barbell back squat, but there are additional advantages for rugby players. The front squat places an increased burden on hip flexibility, and core strength. These are both areas where most amateur rugby players fall down. It’s not sexy to do a bunch of hip flexibility stretches or planks in the gym. Everyone wants to bench till they drop. The front squat is a great way to get your core some much needed time under tension without focusing it it exclusively.
Changing your squat position between workouts is also good for engaging minor muscle groups. The stabilizers you’ll be using on front-squat weeks are different than those of the back squat. Tricking your body in this way allows for greater gains in strength and hypertrophy.
Be mindful of the fact that you’re not going to be able to front squat as much as you can back squat. There’s nothing wrong with that. In fact, it is were the other way around, we’d have a problem to work on. The key to the front squat isn’t the weight, it’s maintaining your form throughout the movement. You’ll want to keep a rigid upper body, drive with your legs and avoid rounding your back as you start your push. If you’ve never front-squatted before, we don’t recommend continuing with the rugby-focused leg workout below. Instead, head to your nearest Crossfit gym and ask a trainer to help with positions.
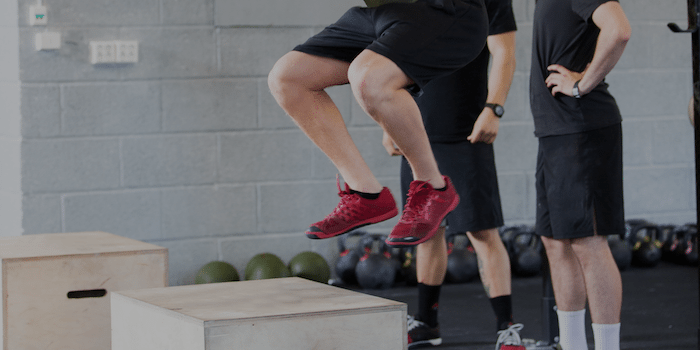
We’ve got the strength part of the power formula covered with the Squat and Front Squat. But we also need to incorporate movements that will give us speed gains. Here’s where we can borrow from a great piece by T-Nation titled Stop Doing Box Jumps Like a Jackass, read it here. As they explain in detail, box jump can very highly-effective tools for developing power. And you simply can’t be powerful if you’re not fast. We suggest reading the full article, but if you just want the cliff notes, here’s their qualification for why rugby players should box jump:
You need speed to bring your strength to new levels and the quickest way to get explosive is with the box jump. Jumps are an awesome display of power, athleticism, and relative strength with directly applicable qualities to nearly every sport.
Key things to keep in mind with your box jumps. We’re not practicing hi[p flexion and your ability to catch your jump in a squatting position. We’re trying to improve our speed and vertical acceleration. If you find yourself struggling to make the height of the box you’ve setup, bring it down. There’s no point risking injury and embarrassment at the gym by setting up a 60 in box and then falling on your face. When in doubt, go lower and remember, its about speed onto the box, not the height of the box that really matters for our purposes. Your vertical jump will get better naturally, but its not the primary goal of this leg workout.
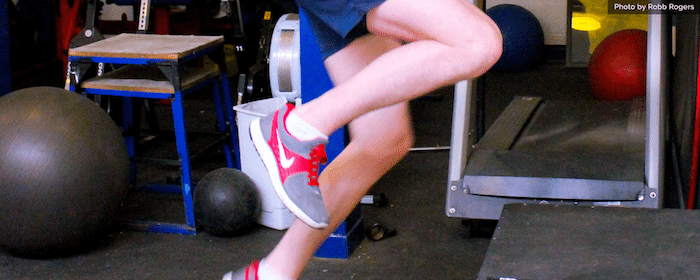
As with the lifts outlined above, we’re going to use a variation on the box jump to maximize our gains in speed. Enter the single leg box jump. Possibly our favorite exercise in this rugby leg workout program. But it won’t start out that way. The first time you do a single leg box jump, you might feel a bit discouraged. Stay with it though. Sprint coach Robb Rogers, has an excellent analysis of why the single leg box jump is such a great power training tool in his blog Single Leg Strength and Power Development for Sprinting. In it, Rogers explains:
This drill (the single leg box jump) is used to improve the hips ability to impart force into the ground when using only one leg in a range of motion similar to the sprint.
This is particularly applicable to rugby, since rugby players will be asked to accelerate off either leg multiple times during a game. By increasing the force we’re exerting on the ground during a push motion, we’re going to be increasing our power through the movement.
When performing the single leg box jump, its critical to avoid a low catch. Catching your jump in a squat position is going to put tremendous strain on your knee and ankle joints. There’s no reason to do this. As with the double leg box jump reduce the height of your box to allow for a quality catch. Stand up completely straight once your jump is completed and DO NOT jump off the box. Step down to reduce injury risk.
The leg programs listed below are designed to give you strength and explosive power. In order to fuel you body for them, you could choose a number of different dietary supplements and simple meals. Exactly what you eat will depend on whether you’re a carbohydrate-adjusted or a fat-adjusted athlete. The vast majority of us who are carbohydrate-adjusted will want to fuel up with simple sugars and salts to provide energy and eliminate the chance of cramp during the workouts.
If you’re comfortable taking a pre-workout powder before lifting, take this about 10 minutes before you begin your warm-up. If you prefer to use an No2 booster, we suggest you take this just before starting your warm-up and throughout your exercise. Since the rugby leg workouts below are only 30mins short, taking a nitrate powder is probably unnecessary. However, you could take some post-practice if you’re looking to reduce your recovery time.
Contrary to popular belief, you don’t need to do a huge amount of warming up before you start a squat session. If you’re carrying an injury or you have bad hip flexibility, you might be an exception to this rule. In which case, grab your foam roller and get to work. But for most of us, our bodies are built to squat. It’s a foundational movement that all humans should be able to perform on command without extensive stretching. If you need 30mins to limber up for heavy squats, stop reading this and go to Yoga.
The only warmup movement you really need before squatting is the ‘Over and Under’. So called because you’re going to replicate stepping over a rope or under a rope in a sideways motion. This movement is perfect for opening up the hips. When you’re going ‘Under the Rope’, you’re transferring your body weight from side to side in your squatting position. When you’re going ‘Over the rope’, you’re practicing driving up with a single leg. It’s everything you need to be ready for the epic leg workout that’s about to follow.
10 SETS OF 3X SQUATS @ 80% 1RM + 3X BOX JUMPS ON 3 MIN
Time: 40 min – Reps: 30
That’s a bit of a mouthful isn’t it? Let’s break it down. The first thing to understand is that the total workout time is 40 minutes. That includes your warm-up and your cool down. What else takes 40 minutes? That’s right, a single half of rugby. The purpose of this rugby leg workout is to replicate a the power you would use during a rugby game. So the time is important. If you’re going over 40 minutes for the workout, you’re likely giving yourself too much rest between sets. To maintain your pacing through the leg workout, you’ll want to start a new set every 3 minutes. This gives you consistent rest periods and forces you to work throughout the 30 minutes of effort. It also gives you plenty of rest.
DO NOT INCREASE YOUR REST TIME. It’s easy to justify this to yourself by saying that you’ll produce a better quality squat with longer rest periods. But remember, we’re trying to replicate a rugby game, not a squat session. If you’re struggling during the last couple of sets, reduce the weight slightly so that you can maintain correct squat form. Again, don’t reduce your rest time. Get back in there and lift.
During this leg workout, we’ll be working at 80% of your maximum squat weight. We call this your 1RM (one rep max). For example, if your best squat (1RM) is 315 lbs, then you would be working at 255 lbs during this program. Working at this weight should feel difficult, but not overwhelming. The key here is that you’re not trying to do 8 rep sets. You only need to get to 3 reps during each set. And you’ll be getting plenty of rest between sets.
The key to this workout is to actually avoid fatigue during each set. Yes, you will fatigue during the workout. But your third rep in each set should be at least as strong as the first with solid technique. During longer sets (6-8 +) your technique goes out the window and you start trying to wrestle with the squat bar. The advantage of keeping sets shorter is that you’ll be doing more high-quality squat movements. That’s a good thing, just FYI.
10 SETS OF 2X SQUATS @ 90% 1RM + 2X BOX JUMPS ON 3 MIN
Time: 40 min – Reps: 20
You’ve recovered from Day 1’s workout and its time to go for Day 2. Hopefully, you’ve put at least 2 days rest between the two leg workouts. At this point, you might be wondering why you’re being asked to do sets of just 2 reps. To better understand why we’ve designed our rugby leg workout in this way, it might be worth jumping over to the rugby renegade website to read their article about the force-velocity curve in rugby.
Day 1’s workout was focused on the strength-speed portion of the force-velocity curve which is ideal for rucking, tackling and breaking tackles. On day 2, we’re going to be working in the maximal-strength portion of the curve. This is the training zone that will help you with scrummaging and fighting for the ball in contact. It’s also a critical training zone for mental performance. The fact that we’re making you perform at close to your maximum effort over and over and over again is a mental hurdle that if passed will make you a mentally stronger rugby player.
Let’s take a tip directly from rugby renegade:
…working up to two- to five-rep maxes, followed by possibly a jump variation. Performing lifts under heavy loads is one of the best things a rugby player can be put through, as it requires a great deal of mental focus, mental toughness, and competitive drive, all of which are necessary to succeed not just on the playing field but also in life.
If you were keeping an eye on the clock during Day 1, you’ll have noticed that doing a single set of 3 squats and 3 box jumps takes ~ 60 seconds. That’s your target time for each set, which gives you at least two minutes rest. On Day 2 each set is going to take you around 45 seconds. Since you need to start again within two minutes, that gives you around 75 seconds to rest. That’s not very much is it?
Luckily, that’s a good thing. The longest break you’ll get in a game of rugby is about 90 seconds. That’s the time it takes for a try + conversion + kickofff OR scrum / lineout to take place. Remember, we’re not training to squat, we’re training to become more powerful rugby players. Embrace the lack of rest. Practice deep breathing. Practice recovering. Practice staying mentally sharp and performing multiple work efforts for 40 mins at a time.
10 SETS OF 3X FRONT SQUATS @ 80% 1RM + 3X SINGLE LEGS ON 3 MIN
Time: 40 min – Reps: 30
There’s a lot to be said for the simple back squat. It allows you to move the most weight of any push exercise (if not, we have bigger problems to solve) which is excellent for developing brute strength. But on Week 2, we’re going to change things up and go with the front squat so that we’re working slightly different muscle groups and practicing a different body position. The primary benefit you can derive from including front squats in your rugby leg workout to force your stabilizer muscles to support your lift.
During a front squat, the muscles in your hips, obliques and posterior chain will be contracting for an extended period of time (around 20 seconds or so). Time under tension is critical for developing core strength and this is one of the best ways to get it using a functional movement. Core strength is essential for rugby. Yes, we’re doing a power leg day, but that doesn’t mean we can’t be working on complimentary muscle groups at the same time.
This probably goes without saying. But doing a lot of sets of front squats is really hard. Before you get to the gym, take a few minutes to prepare mentally for what’s about to happen. Front squat days are one of the few times where a cognitive enhancer can be useful in the gym. You’re going to need focus, attention and clarity of mind to get through these next two sessions. Stay off Instagram, in fact, just put your phone back in your gym bag.
10 SETS OF 2X FRONT SQUATS @ 90% 1RM + 2X SINGLE LEGS ON 3 MIN
Time: 40 min – Reps: 20
How do you even approach a rugby leg workout like this? Any way you slice it, 15 sets is a lot. The best way to approach this session is not to think at all about the sets. Remember, your effort period is still only 30 minutes. And you’re still only doing 30 reps. Nothing has changed from the other 3 leg sessions we’ve done here. You’re just altering the pacing slightly. That’s what we tell ourselves before stepping up to the bar on Week 2 Day 2 for the final front squat session.
Keeping a short-term focus will help you too. We try to break the workout up into 5 blocks of 3 sets. The first block, you’re really just getting warmed up, working on your breathing and trying to lock your form down. The last block, you’re holding on. And all the stuff in between? Well that only takes 18 mins and anyone can get through an 18 min leg workout.
When you hit your stride with this rugby leg workout, the way you feel about it changes. Initially, you’ll be stressing about the front squats and the single leg box jumps will be an extension of your rest period. That’s ok when you start the program. But as your front squat improves, you’ll begin to see the 2-rep sets as a piece of cake and you’ll be ready to challenge yourself with increasingly difficult jumps.
Much like the front squat, the single leg box jump variation works minor muscle groups that a standard box jump doesn’t really hit. In the front squat, you’re working stabilizing muscles through a slow contraction which gives your stabilizer muscle great time under tension. With the single leg box jumps, you’re working those same muscles in an explosive manner and landing in a crouched position. The landing in particular, combined with a full extension back to a standing position is excellent for your balance and body control. As we stressed above, always get back to standing.
We’ve been doing a lot of work in these sessions. Now its time to slow everything down and stretch out those hips. the best cool down exercise to perform after our rugby leg workout is a very slow walking lunge. Starting with your feet together, take a medium step forward with you right leg. Stabilize your body and then drop your body straight down and hold for a count of 3. Repeat on the left side. You should be aiming to walk a total distance of around 20m in about 2 minutes. Don’t overextend yourself through these movements. Your legs have just suffered through a tough session and avoiding muscle tears is critical.
As you can probably guess, the slow backward walking lunge is a very similar movement. You’re just going to be walking backwards instead of forwards. We recommend that you walk out 20m going forwards. Take a minute’s rest. Then repeat the process going backwards. It’s not rocket surgery, but try not to go too fast. There will be a tendency to race through the cool down. Be mindful of this tendency before you start your warm up and try to focus on staying slow and deliberate through your movements.

The materials and information provided in this presentation, document and/or any other communication (“Communication”) from Ruck Science, LLC or any related entity or person (collectively “Ruck Science”) are strictly for informational purposes only and are not intended for use as diagnosis, prevention or treatment of a health problem or as a substitute for consulting a qualified medical professional. Some of the concepts presented herein may be theoretical.
References to any non-Ruck Science entity, product, service, person or source of information in this or any other Communication should not be considered an endorsement, either direct or implied, by the host, presenter or distributor of the Communication. The host(s), presenter(s) and/or distributor(s) of this Communication are not responsible for the content of any non-Ruck Science internet pages referenced in the Communication. Ruck Science is not liable or responsible for any advice, course of treatment, diagnosis or any other information or services you chose to follow without consulting a qualified medical professional. Before starting any new diet and/or exercise program, always be sure to check with your qualified medical professional. For details of our affiliate program please see our Terms & Conditions. Click here for our Privacy Policy